Search This Blog

Friday, January 6, 2012

New Year


I've been thinking about a keynote for the year. I don't usually fall prey to the old adage that New Year's is supposed to have some magical self transforming power to make all our bad habits disappear. But this time, I think I will allow myself to indulge in the notion that indeed, everyone needs a starting point.

I am claiming 2012 as the year to order. Order priorities, order the house, order routines, etc.

There will be many more entries as I reinvent the blog and include much more about how we manage our growing family. 2011 brought us a new little one, X. He arrived in July and was born right here in the Magnolia.

He has brought a fresh energy to the house and so we will do our best to harness it and ride the wave.


Peace,
Maria

Tuesday, November 30, 2010

Dining Room


It's been a bit since I've updated. Once again, we've been busy. I debated what would be "next" in our quest to make this house a home. I decided that the dining room was where we spend the majority of time. It's become the hub of the house. Homework, eating, hang out, and the fact that it's off the kitchen and the office/computer room is right there, makes it popular.

It need warmth, but the architecture is overwhelming to me. So I went with something I've never done before; beige.

I'm SO not a 'beige' person.


The piano and subsequent white walls.


So I painted the walls beige. "Harmony" by Benjamin Moore to be exact.

But what to do about those heavily textured panels?

I decided (after 4 attempts at other techniques) to paint them with the same base as the walls, stencil them with a metallic paint in a repeated damask pattern and glaze over it with a deeper "tea stained" look to knock down the metallic a bit.


New carpet


New drapes (courtesy of 1/2 off clearance fabrics at Joann - $6 a yd!!)


AND - the finishing touch - My 'new' hutch! I love how this turned out!
(See the 'before' in the first pic!)


This was a piece that I salvaged from a nursing home that was throwing it in the dumpster - such a waste!!

Overall, it was pretty much done for our Thanksgiving celebration - we had a great day!

Monday, October 4, 2010

Master Bedroom

BORING!

It's not what I promised in my last post, but it's something.

I still have yet to update you on the mudroom, but that's coming soon.

Husband was away for the weekend and it's usually not unheard of that I will play when he's away. For some reason, I get bursts of energy and adrenaline to complete a project when I'm "alone". Granted, I still had all the kids with me, but my oldest daughter was as gung ho as I was to pull off a 48 hour room transformation. (OK, it was more like 84- but it was still quick.)

I had the bones to work with: A headboard that I thought had great potential, and second hand dressers with great lines, but a terrible finish. 1960's blonde veneer; yuck. My palette was grey, black and shiny.


We cleared the room. Daughter started priming the bureaus on the back porch while I painted walls. My only 'limit' was that DH did not want the woodwork painted, other than that, I had carte blanche.

I chose Behr premium latex in eggshell for 3 of the walls in a color called "Rocky Mountain Sky. The fourth wall, which my headboard would be mounted onto was painted with Ralph Lauren metallic in Silver Plated. I had a tough time getting the finish right on this wall - I ended up applying the last coat with a roller and then using plastic wrap to blend in the roller marks. They sell a special roller to use with this paint at Home Depot. Don't skimp, buy it.


Meanwhile, on the back porch, the bureaus were primed


And then I used Rustoleum Ultra Cover 2x in granite and taped it off for my finish on the drawers and hardware with Rustoleum Universal in Hammered Black.
I will never paint furniture with a brush again! This saved an amazing amount of time and back breaking work. It wasn't that much more expensive either and the finish is unparalleled.


and


and


I loved the way the bureaus came out and the satin sheets are great, but they are the most impractical bed linens ever. They slip off the bed too easily and you end up waking up freezing with no covers on you!


A few accessories I picked up at a local outlet store.


The look of pinch pleat drapes with store bought ones and clip on rings:


I "shopped" in my own house and relocated this rug from my dining room where it was getting abused by the kids! Best part? It came with the house. Score!!


I need a few finishing touches, like a new ceiling fan and to re-do those sconces. But both require some electrician skills and I wasn't about to attempt that whilst sleep deprived and hyped up on caffeine.

Overall, I love the makeover, it gives our room a calmer, sleeker look. We need a sanctuary to retire to since we've been working so hard on the rest of the house!

AFTER

Saturday, May 15, 2010

Backsplash

I knew that I wanted white subway tile for the backsplash. In fact, I wanted it over the entire back wall behind the sink. At 21 cents a piece, it's a reasonable option. We used American Tile 3x6 porcelain subway tile in Snow White.

I had gone to my local Habitat for Humanity Restore and purchased adhesive and grout for about 25% of the original price. This project was by far, the most economical one we have done.

Neither one of us had tiled previously, but DH got the hang of it quickly.


This is actually them installing my awesome Domsjo IKEA apron sink.

The wet saw and straight cut tile saw borrowed from our friend made all the difference in the world. Once we got going, it went very quickly and smoothly.


We had to run the first course of 2-3 rows and let them sit for 24 hours. Then we were able to build upon that foundation of tile, so to speak. With the team work of me cutting and him laying, it made for an evening's worth of work. I grouted the next day and voila!


By the way, doesn't that sink rock?!!

Peace,
Maria

Monday, May 10, 2010

Granite Countertop

I had a dilemma. Because of the funky layout in the kitchen, custom countertops were way out of our budget. I needed to figure out a way to maintain the layout and work with the one inch thick plywood that was currently on my countertop. I didn't want to buy a new piece of laminate with inferior pressed wood under it. I lifted the existing tiles off - some of them with my bare hands they were so loose.


Then we laid the hardy back cement board down over the plywood. It is a great product with graphed out lines for easy cutting. Just score it with a special tool and snap like drywall.
Every 6 inches there is a marked circle where to put the screws in. Use the ones that are especially made for this product. The last thing you need is a screw lifting out and cracking your tile or grout.


Next we laid out the absolute black 12x12 granite tiles.


Our friend, Mark, (pictured left) had a wet saw that we could use to make all of our cuts with.

The biggest snafu was the edging.

At first we thought to use a new product by this company:
http://www.schluter.com/139.aspx

Really great product, perfect for our needs. But, we didn't have the time to wait for the corner pieces to be ordered and we were not sure that we could make the cuts well enough on our own.
So we decided to use a black granite chair rail piece:

http://www.homedepot.com/h_d1/N-5yc1vZ1xiy/R-100664289/h_d2/ProductDisplay?langId=-1&storeId=10051&catalogId=10053

Also a great product, but trying to make mitre cuts was IMPOSSIBLE!!!
After a few attempts and about $20 in wasted material, we were at a loss.

Then my DH had a stroke of brillance. We had put up a bit of the glass tile on the back splash and there was a couple of rows cut off from the mesh backing. He put it up to the edge and came up with this idea:


Awesome. And very custom I might add. I loved it. So, after a lot of adhesive, cutting and grout, we had this:


Back splash and wall of tile to follow!

Peace,
Maria

Remodeling II

Ok, so I am going to attempt to get this all down. There has been so much going on around here that I'm not sure I can remember it all during this whirlwind of activity.

The cabinets have all been painted white. My friend Peter helped me accomplish this monumental task. In some instances, we needed 3 coats of primer and then 3 more coats of paint. We did use the newest product from Behr - Ultra Premium, Primer and Paint in one. I used a primer sealer first and then used that paint over it. I would not reccommend using it on bare wood without some sort of sealer primer first. It's a great product, but it doesn't give it enough 'tooth' on its own.

This is a before pic (excuse the mess - it makes it more authentically 'before')


I took off the original hardware and sprayed it. I know that many might think that is not authentic, but all the other cabinetry got new hardware and I was trying to make it all cohesive. It helped bring out the detail in the fabulous latches. I will add the entire countertop project step by step soon!

Peace,
Maria

Tuesday, April 27, 2010

Paint

I have some 'down time' on posting since we will be working on the kitchen and mudroom for the next week and a half. I will update the process as I get pics taken and can show a finished product.

In the meantime, I will share some of the 'pre-blog' projects we have completed.

Mostly, it's just paint. Boring coats of paint.

Yet, how instantly a fresh color can transform a space, giving it new life and ownership.

Choosing colors can be tricky. Look at a shade in the wrong light and when you get it home on the walls, you could be in for a surprise. My rule of thumb, especially with the children is to choose a color, but I chose the shade or tone. My oldest girl wanted a purple and green room. We chose the lightest lavender and a fresh, springy green that just hints at yellow. With the right accessories, any color can compliment another and with bright white trim, the colors really 'pop'.

I love white trim, but I'm limited in this house. The trim that was painted is ok to repaint. I have 'carte blanche' in the kitchen/laundry room/mudroom which are the work horses of the house and therefore 'my domain' (DH is adamant about leaving all the other wood untainted by acrylic). The rest of the house has unbelievably gorgeous woodwork that has never seen the likes of a paint brush. We are not going to start now. Despite my yearnings to see white trim with fresh color, after painting the trim and windows and doors in the back section of the house, I'm done! It's painstaking work, and although I enjoy it - I can't imagine having to re-coat every few years to keep it looking fresh. No thanks. I'll maintain the integrity of the original wood and keep every guy that walks in here happy. What is it with men and wood?

Anyway, here are some photos to fill the dead air whilst I lay granite tile.


Third floor bedroom - dubbed 'the princess room' BEFORE


Another bedroom - BEFORE


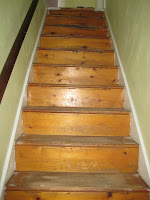
Third floor stairs after they had their 30 year old carpet removed and before they were painted.